|
Purpose
This blog post presents a simple way to automatically convert your AsciiDoc content to HTML and PDF, then publish those files to a public website on each commit. There are many way to do it, maybe you have already used Jekyll or other static site generator like that. The real benefit of this one is that the workflow is done thanks to only one Travis CI configuration file. |
The High-Level View
You have all your AsciiDoc sources files on one branch, all the generated files on another branch and just one configuration file.
All resources explained in this post are listed below:
-
AsciiDocfiles and.travis.ymlconfiguration file on asciidoc-to-ghpages project master branch -
HTMLandPDFfiles on asciidoc-to-ghpages project gh-pages branch -
Files published at https://mgreau.com/asciidoc-to-ghpages/
Overview
The following diagram gives you a quick overview of all interactions between GitHub, Travis CI, Docker and Asciidoctor.
Travis CI makes it possible because it allows you to run any Docker container. This isolates your build from the machine running on Travis CI and allows you to use an Asciidoctor environment that has been prepared for you.

Prerequisites
This post assumes that:
-
you know AsciiDoc and Asciidoctor
-
you have a GitHub account and a GitHub project configured to publish content from the gh-pages branch
-
if it’s not the case you can read the GitHub tutorials about GitHub Pages
-
-
you have a Travis account linked to your GitHub account
-
if it’s not the case, you can read the Travis CI Guide for beginners
-
Prepare your GitHub project
Add files to your GitHub project
The first step is to push some files to your master branch. The following GitHub project gives you a sample AsciiDoc content using images and include directive.
| All samples come from this OpenDevise GitHub repository, thanks to Dan Allen. |
All files available on this demo project are explained below:
+ images
   |- tiger.png     (1)
+ includes
   |- include.adoc  (2)
.gitignore
.travis.yml    (3)
demo.adoc      (4)
LICENSE
README.adoc (5)| 1 | Image used in AsciiDoc content |
| 2 | AsciiDoc content included in the demo.adoc content |
| 3 | Travis configuration and scripts to build and publish the project, this file is explained in the Travis part. |
| 4 | Sample AsciiDoc file to convert |
| 5 | Documentation for the GitHub project, then converted to index.html file for the website |
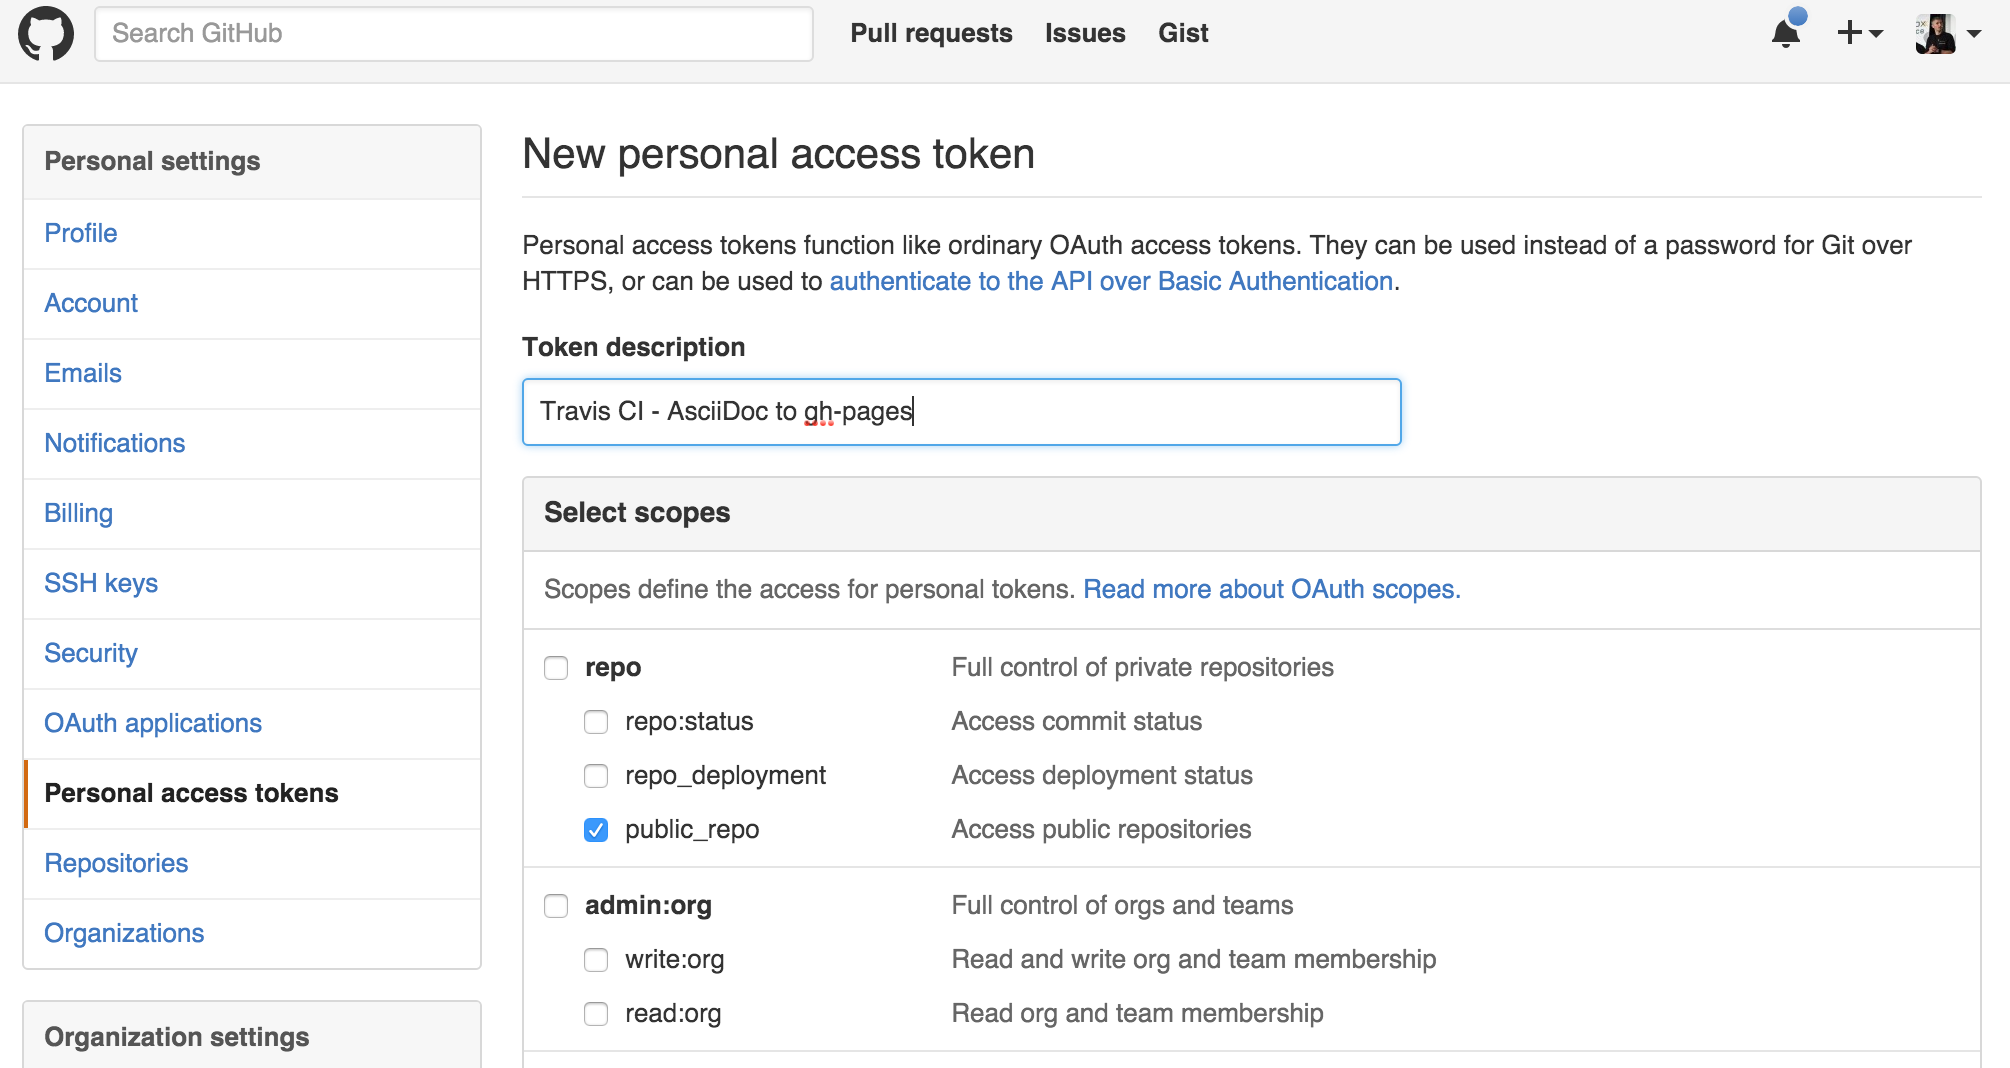
Create a Token for Travis CI
Travis CI will push files on a dedicated branch of your GitHub project, so you need to create a token to allow Travis CI to do it.
As you can see on the following screenshot, you just need to access to your GithHub Personal Settings page and click on the Generate token button, then check the public_repo scope:
Travis CI Configuration
Connect Travis CI to your GitHub project
Once your AsciiDoc project is available on the master branch, you need to access to your Travis CI Dashboard and do some quick configuration so that Travis CI can build your project:
-
First, on your Travis Profile page, you need to
Flick the repository switch onfor your GitHub project:

You can’t see your project on the list? Click on the Sync account button (top right) and it should be ok.
|
-
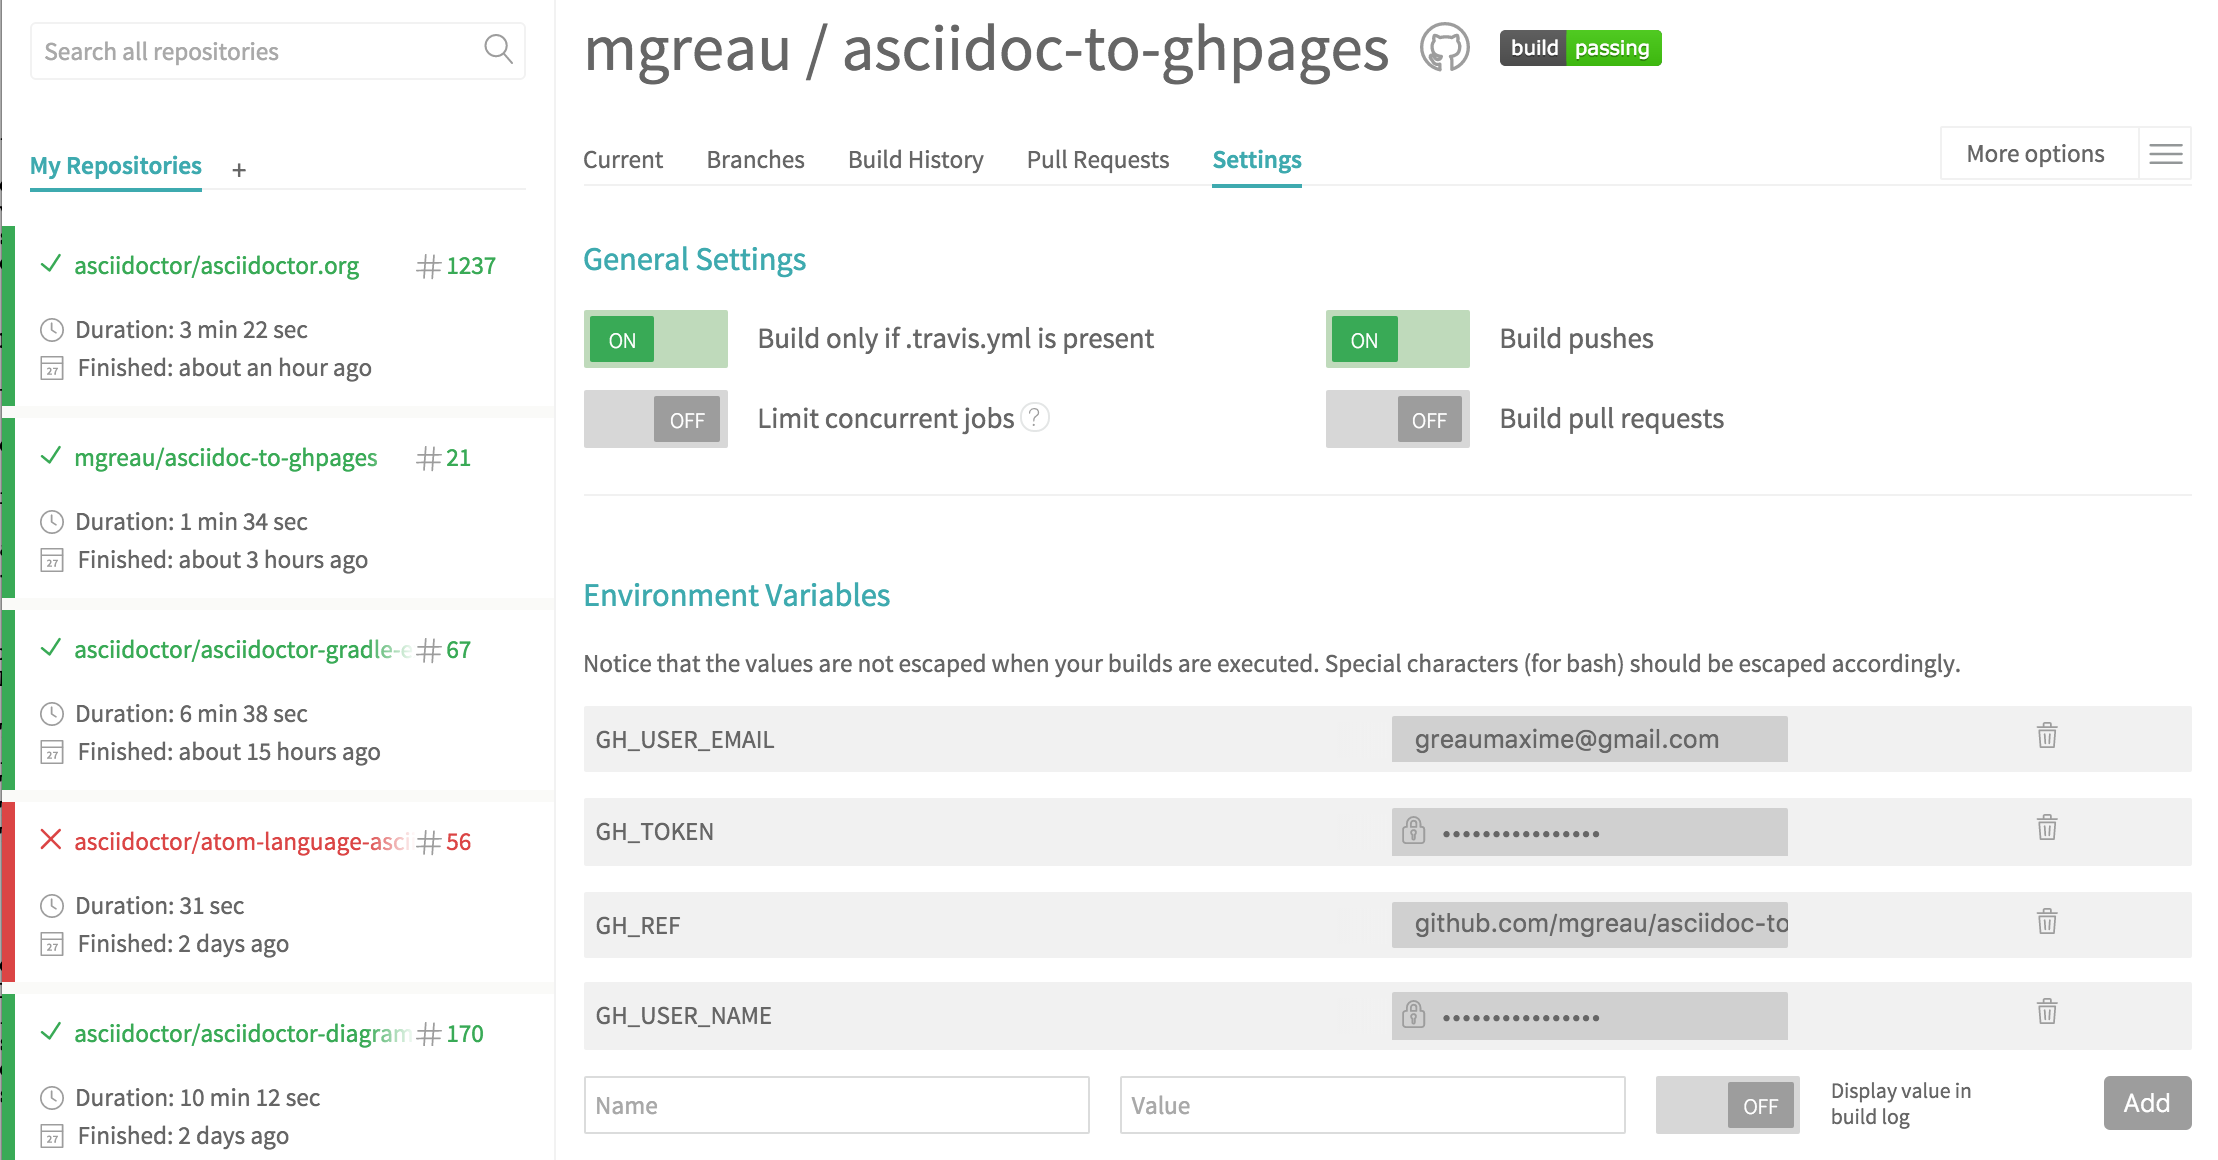
Then, as shown below, go to the
Project Settings tabsand configure it:-
Check some options on
General Settings-
check the
Build only if .travis.yml is presentoption -
check the
Build pushesoption
-
-
Create some
Environment Variablesthat will be used in .travis.yml file:-
GH_USER_NAME: your GitHub username -
GH_USER_EMAIL: your GitHub account email -
GH_TOKEN: the token created on previous stepUncheck the Display value in build logoption -
GH_REF: the URL to your github project
-
-
.travis.yml: Travis CI Configuration and Scripts
The .travis.yml file is the most important file here ;)
Indeed, in this file, you tell to Travis CI how to process your AsciiDoc files and where to publish the generated files.
Those scripts will be executed after each update on master branch.
sudo: required

services:
  - docker                  (1)

before_install:            (2)
  - mkdir -p output
  - docker pull asciidoctor/docker-asciidoctor

script:
  - docker run -v $TRAVIS_BUILD_DIR:/documents/ --name asciidoc-to-html asciidoctor/docker-asciidoctor asciidoctor -D /documents/output *.adoc      (3)
  - docker run -v $TRAVIS_BUILD_DIR:/documents/ --name asciidoc-to-pdf asciidoctor/docker-asciidoctor asciidoctor-pdf -D /documents/output *.adoc    (4)

after_error: (5)
  - docker logs asciidoc-to-html
  - docker logs asciidoc-to-pdf

after_failure:
  - docker logs asciidoc-to-html
  - docker logs asciidoc-to-pdf

after_success:      (6)
  - cd output ; mv README.html index.html ; cp -R ../images images
  - git init
  - git config user.name "${GH_USER_NAME}"
  - git config user.email "{GH_USER_EMAIL}"
  - git add . ; git commit -m "Deploy to GitHub Pages"
- git push --force --quiet "https://${GH_TOKEN}@${GH_REF}" master:gh-pages > /dev/null 2>&1| 1 | Tell Travis CI that you want to use Docker |
| 2 | Create the needed output directory and download the official Asciidoctor Docker image from DockerHub |
| 3 | Convert AsciiDoc files to HTML to the /documents/output/ path with a Docker container |
| 4 | Convert AsciiDoc files to PDF to the /documents/output/ path with another Docker container |
| 5 | Display logs from containers if a problem occured |
| 6 | Initialize a git project in the `output/ sub-directory in order to push the generated files and images to the gh-pages branch |
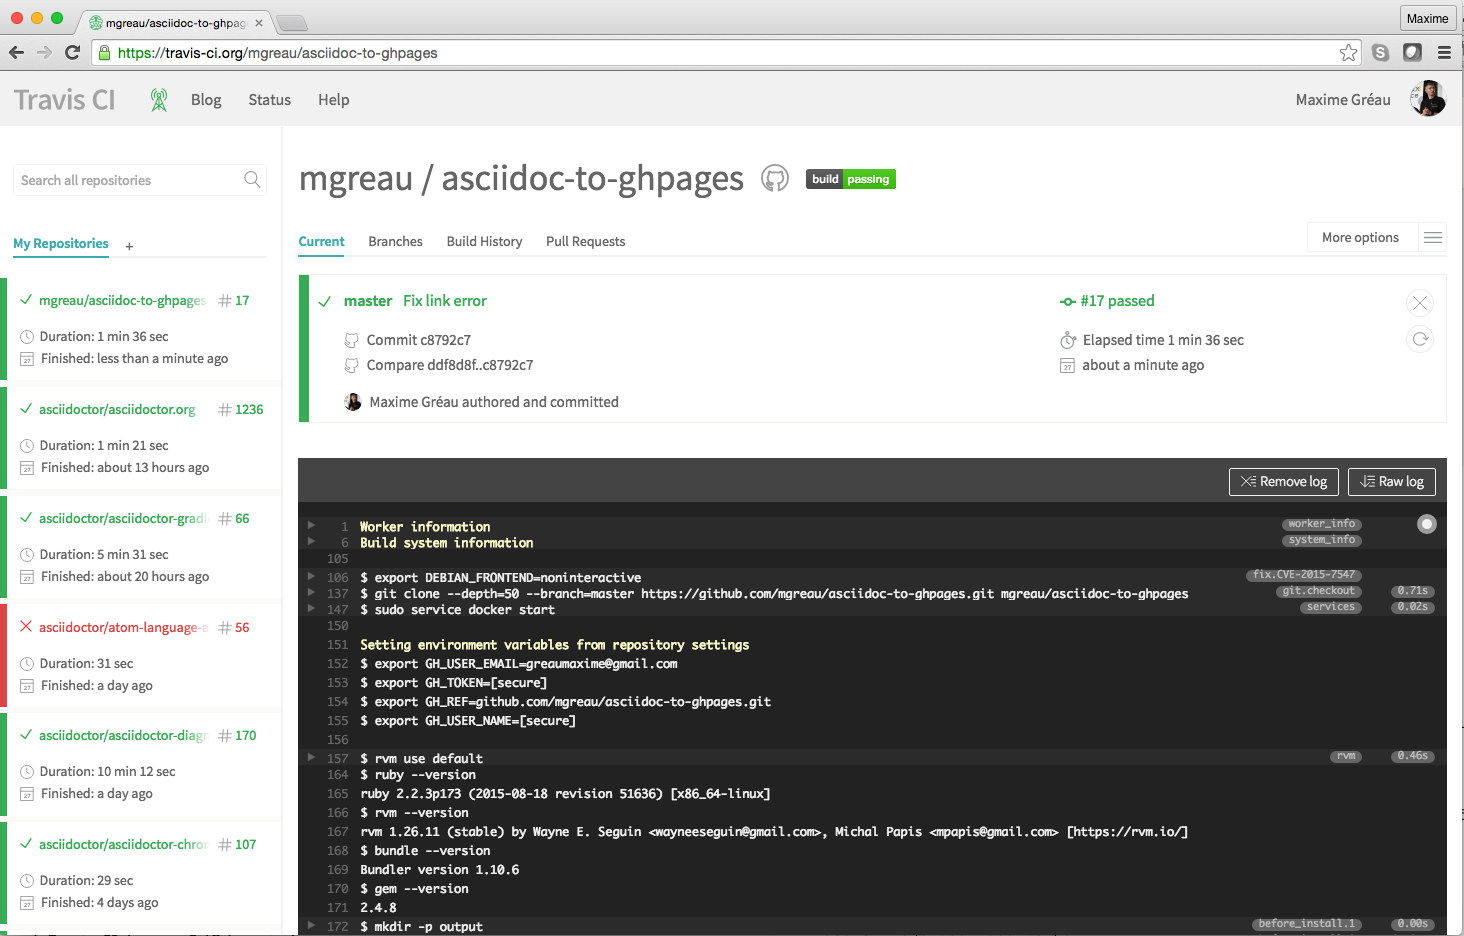
Travis Build Logs
Travis CI gives you access to each build logs.
You can see in realtime, what is going on when AsciiDoc files are processed by Asciidoctor on each Docker container (one for HTML output and one for PDF output here)
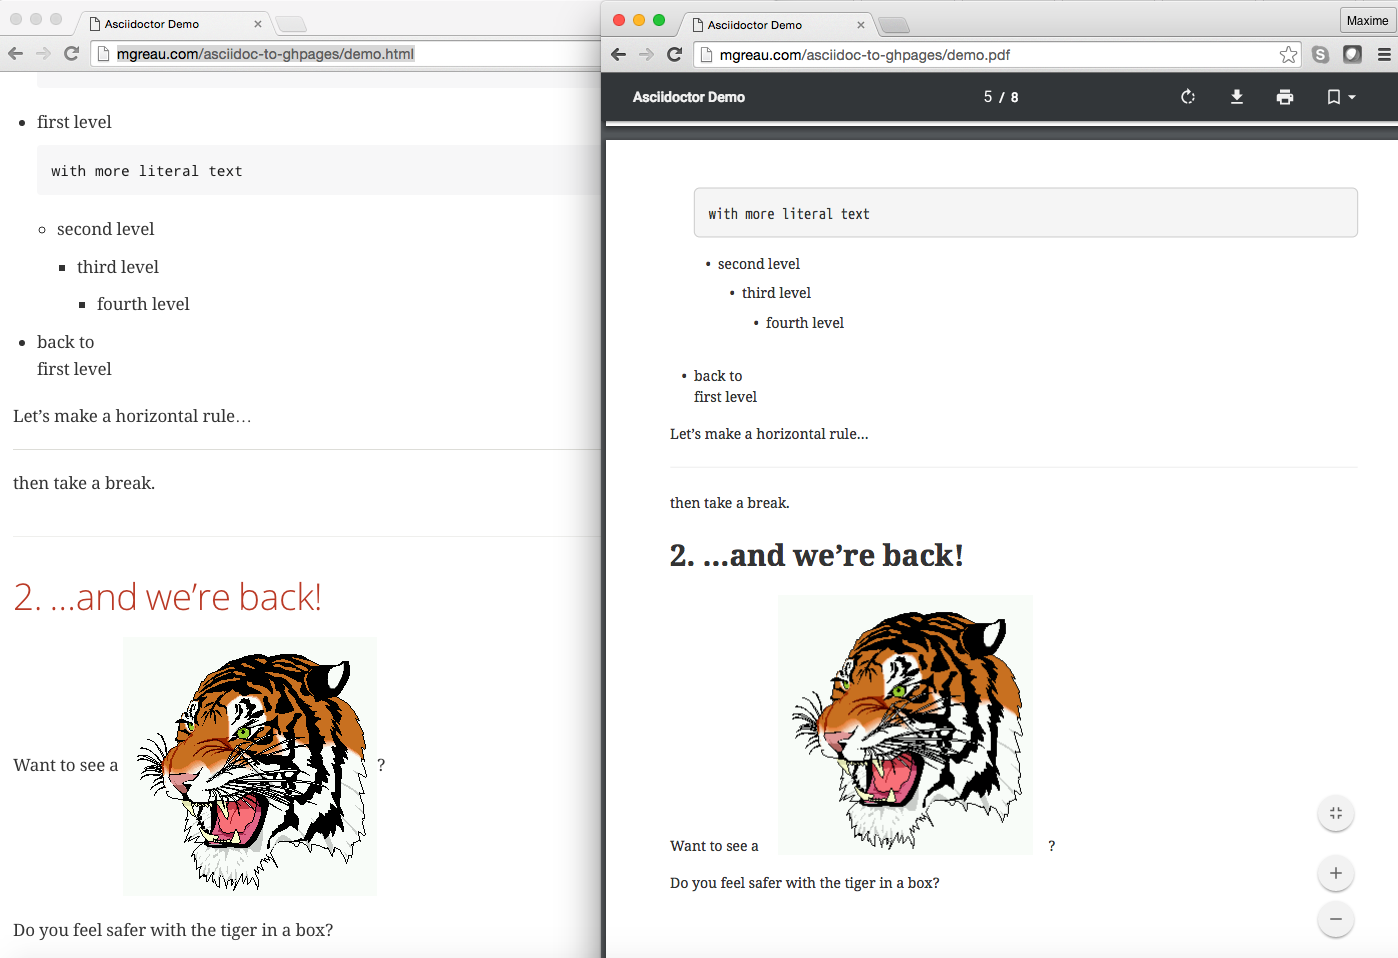
Published files (HTML & PDF)
Finally, when the Travis CI Build has succeeded, you can view the generated files at:
+ images            (1)
   |- tiger.png
demo.html         (2)
demo.pdf          (3)
index.html    (4)
README.pdf| 1 | The images folder is copied so that images are published to GitHub Pages Website |
| 2 | The HTML output file |
| 3 | The PDF output file |
| 4 | The README.html is renamed to index.html in order to have a homepage file for the Website |
I hope this post was useful and it helped you understand how to combine Travis CI and Docker to automatically convert content written in AsciiDoc and publish the output to GitHub Pages on each commit.
There are a lot of other ways to do it, I’d love to have your feedbacks about it, so feel free to add a comment.